iOS app reverse engineering is essential for mobile security professionals, pentesters, and developers seeking to understand application behavior, discover vulnerabilities, or verify compliance. With each iOS update, including the latest iOS 26, Apple tightens security and obfuscation layers—raising the bar for reverse engineering workflows. This guide provides a step-by-step overview of how to reverse engineer an iOS app using practical tools and modern techniques, while highlighting how Corellium’s virtual device platform simplifies and accelerates the process for high-fidelity testing.
Reverse Engineering iOS Apps
iOS applications are distributed as compiled binaries and are not readable by default. To reverse engineer an iOS application, the binary needs to be disassembled into a form that is easier to read and understand. This can be done using various tools, which we will look at in this blog post. These tools allow users to disassemble the binary and extract the source code for further analysis.
Once the source code has been extracted, it can be analyzed to understand how the application works and identify potential vulnerabilities or security weaknesses. It is also possible to modify the source code and recompile the app to bypass security controls or certain application functionality.
iOS 26: What’s New and What It Means for Apps
Apple’s latest iOS 26 release introduces even more aggressive code signing enforcement and runtime protections. For reverse engineers, this means a growing reliance on dynamic analysis techniques. Corellium provides easy root level access to various OS versions and lets researchers bypass these hurdles safely and quickly—without needing risky, physical devices or labs.
iOS Reverse Engineering Tools You Should Know
Several tools can be used for reverse engineering iOS mobile apps. Some of the more popular ones include:
• Ghidra: This powerful, free and open-source reverse engineering tool can be used to analyze iOS applications. It allows for disassembly, decompilation, and debugging of iOS binaries, and can aid in the discovery of vulnerabilities or understanding of application behavior.
• IDA Pro: This is a professional-grade reverse engineering tool that many security researchers and analysts use. It can disassemble and decompile iOS applications.
• otool: This is a command-line tool included with every version of macOS and can be used to view the contents of iOS app binaries.
• Class-dump: This is another command-line tool that can generate class information from an iOS app's executable file.
• Radare2 (also known as "r2") is a free and open-source reverse engineering framework that can analyze, disassemble, and decompile iOS applications.
• Strings: A simple utility that can extract and display printable strings from a binary file. It can pull strings from iOS application binaries and be a valuable tool for reverse-engineering iOS applications.
It's worth noting that reverse engineering iOS applications is a complex process that requires a good understanding of low-level programming concepts and technologies. The above list of tools is not exhaustive; it includes many of the common tools used to get started with iOS reverse engineering.
Disassembling iOS IPA Binaries: A Step-by-Step Walkthrough
For this blog post and examples, we will work with a couple of intentionally vulnerable iOS applications publicly available, starting with DVIA for iOS.
Let’s start from the beginning when we have an IPA file for deeper analysis. An iOS application IPA file is essentially a ZIP archive and can be unzipped using the Archive Utility for Mac or any similar utility, depending on the OS being utilized.
iOS IPA files have a “Payload” folder that contains a .app file, often with the same name as the application that is being analyzed (for example, “DVIA-V2.app”)
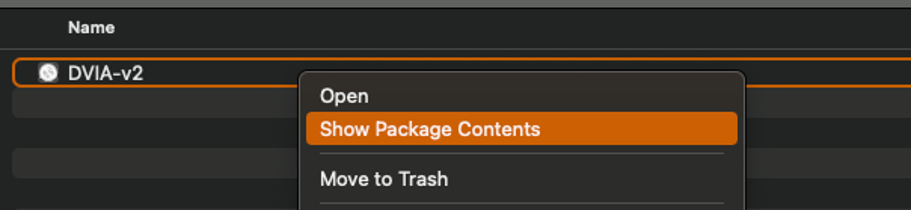
On Mac, if you right-click the .app file, you can “Show Package Contents” to display the files that make up the binary.
As you can see from the screenshot above, when you review the files within the .app package, you will see a UNIX executable file with the same name. This is the application's main binary file. The additional files within this directory are supportive components that keep the application running (settings, frameworks, SDKs, etc.).
 Now that we have a good understanding of the IOS file structure and how to access the applications binary file, we can look into the various reverse engineering tools and how they can be used.
Otool
Otool is a handy tool for iOS reverse engineering; it can be versatile and dump various information regarding the iOS application. Here are a few examples of what otool can be used for:
• To identify the architectures that an iOS application is built for
• Otool can display a list of shared libraries the application links to. This can be valuable for determining the iOS application's dependencies and better understanding the overall implementation.
• Otool can display a list of object files that make up an application, which can help better understand the application structure and components used.
• Lastly, otool can display the symbols (i.e., functions and variables) that an iOS application exports.
A good starting point with Otool is to check the headers to see which architecture the application is built for; this can be done using the following command.
otool -hv DVIA-v2
As you can see from the screenshot below, this application is built for arm64. Some applications might also be built for armv7, which is 32-bit.

This architecture information can be important as we use additional tools such as class-dump, so let's remember the results of running that.
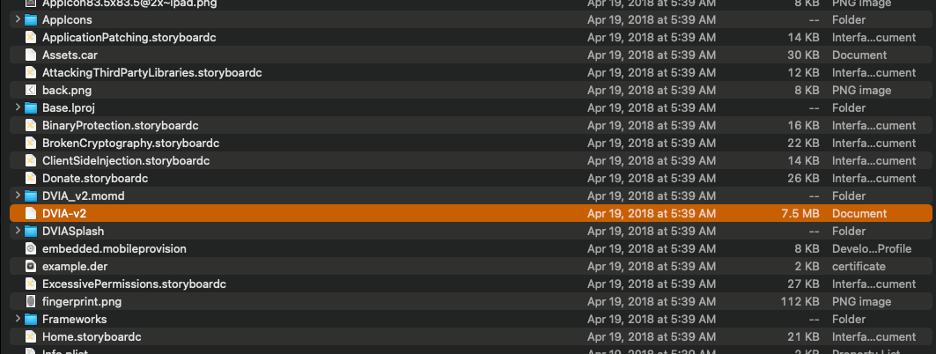
One of the most common uses for otool is to check for various shared libraries and identify if there are any potential vulnerabilities which we will show a demo of.
Use the following command to display the libraries: (Adjust for your specific application and path to the binary)
otool -L DVIA-v2
While just looking at this information will not lead you directly to a vulnerability, you can see the shared libraries that are in use by the application along with associated versions. Taking that information and doing additional research on publicly available exploits can increase your testing coverage and uncover potentially high-risk vulnerabilities.
Class Dumping: Extracting Swift and Objective-C Interfaces
Another great way to understand an iOS application's behavior is to read the interfaces exposed when dumping its classes. As you probably know, iOS applications are no longer exclusively written in Objective-C; they are now written in Swift or a combination of both.
This means we need to adjust some of our tools. The older version of ‘class-dump’ won’t work if there is Swift code within the binary. Luckily, two versions are available depending on how the application is developed. Knowing the application's architecture from the above commands can help identify which version should be run.
• Class-dump-Objc
• Class-dump-Swift
‘class-dump’ for Objc can be downloaded from the link above or installed on a Mac using Homebrew and the following command.
brew install class-dump
For the swift version of ‘class-dump,’ you can use the link above to download the binary and the following commands to execute
mv class-dump-swift /usr/local/bin
chmod +x /usr/local/bin/class-dump-swift
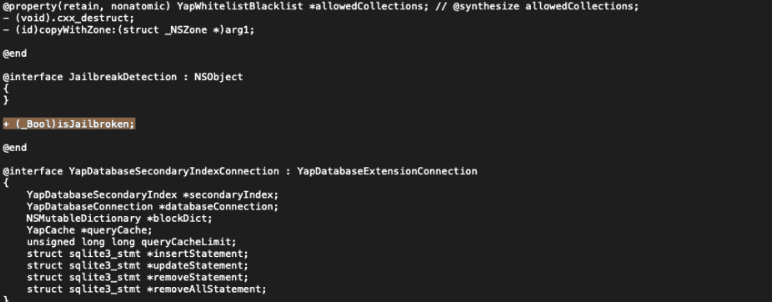
Similar to using otool above, go into the directory containing the UNIX executable for your iOS application to run ‘class-dump,’ as you will see in the command below. I have saved the output to a text file and shown an excerpt below.
class-dump-swift DVIA-2 > DVIA_2_dump.txt
Within the output, you will see the classes, methods and even instance variables for the iOS application. This information is a great way to start reverse engineering an application with a better understanding of the application and places to search. In the screenshot above you can see references to “isJailBroken”, while there is a ton of information in this file looking for some keywords that might lead you to patching out an application, hardcoded secrets, etc.
When launching the DVIA-2 application there are a few various jailbreak checks that need to be bypassed and, while there are Frida scripts out there that can do some, we will go over how to look for some of those jailbreak checks further in this blog post.
Strings and Metadata: Finding Vulnerabilities in Plain Sight
As the name suggests, the “strings” command is a simple utility used to extra and display the printable strings from a binary file. This can be useful when looking for hardcoded credentials, secrets and similar information that a developer might have left behind unknowingly. Essentially there are three main reasons for running the “strings” command:
• Identifying potential file paths or application metadata to understand the application's structure and organization of files/resources
• Identifying hardcoded values such as keys, passwords, or URLs that are being stored as strings within the application binary
• Lastly, identify user-facing strings such as labels, buttons and messages better to understand the user interface and overall application functionality.
Much information can be gathered by utilizing the strings command and the grep command to fine-tune the results. As we talked about above we are looking at the jailbreak detection code to see how we could potentially get around that, with that in mind we should utilize the strings command just to see what is there relating to jailbreak.
strings DVIA-v2 | grep -i jail
The above command, as an example, will search for the word “jail” within the DVIA binary; every use case is different depending on what you are looking for.
As you can see from my screenshot, searching for specific values (jail in this case) can be handy to find strings within the binary that can be further analyzed through an iPhone disassembler. This is a great starting point to get more information as you move to patch out the application or build a script to bypass security controls.
iOS Disassemblers: Navigating Binary Internals
iOS disassemblers can be used to analyze and understand the code of compiled binaries. In the context of iOS reverse engineering, disassemblers are often used to examine the inner workings of iOS applications, know how they function and search for potential vulnerabilities within.
Several disassemblers are available in iOS reverse engineering, including IDA Pro, Hopper, Radare2, Ghidra and Binary Ninja.
Overall, iOS disassemblers are an essential tool in the arsenal of any iOS reverse engineer, no matter which disassembler you choose. For this blog post, we will show some examples within Ghidra, but by no means is that the only disassembler you can use to perform these actions and analyses.
Open the executable with Ghidra; this will likely take a few minutes to load and perform the built-in analysis.

Once the executable is loaded, we need to review the code where the jailbreak detection is taking place. To get more information, let's first launch our application on Corellium and run a Frida trace to see if we can narrow down where in the code we should be looking.
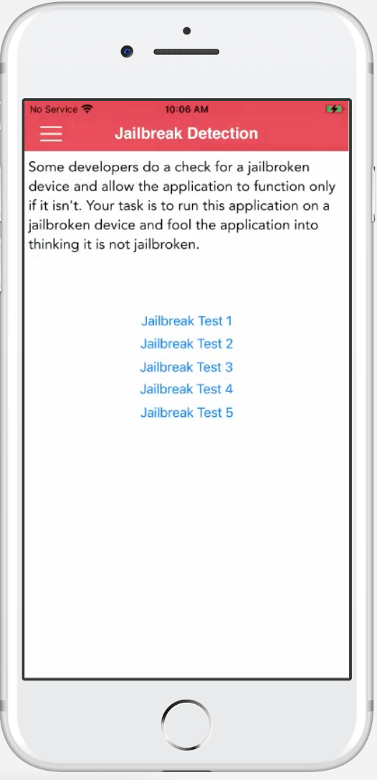
For the purpose of this exercise, we will focus on the “Jailbreak Test 1” functionality, as shown in the above screenshot.
Using Frida-trace either within the Corellium console or on your local machine while utilizing USBFlux (Corellium Cloud Only), we can run the following command to look for instances where jailbreak detection is being utilized. While running the trace ensure to click “Jailbreak Test 1” within the running app.
frida-trace -U -i "*jailbreak*" DVIA-v2
Frida-trace shows us all the functions that are called relating to the jailbreak detection and you can see in the screenshot at the bottom the function that is called when the first Jailbreak Test within the app is clicked.
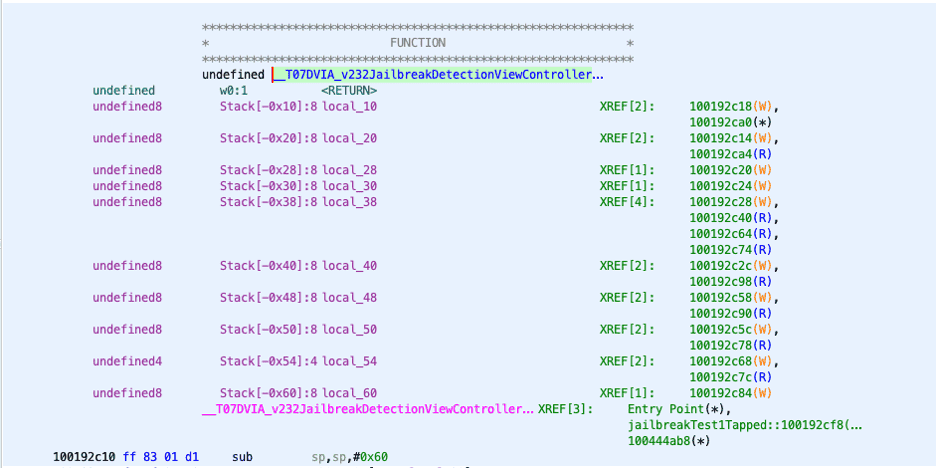
With the following function name identified we can search within Ghidra to access it.

_T07DVIA_v232JailbreakDetectionViewControllerC20jailbreakTest1TappedyypF
While reading the disassembled code can be overwhelming, it takes time to get comfortable with but using examples like the one I will continue to show will greatly help going forward.
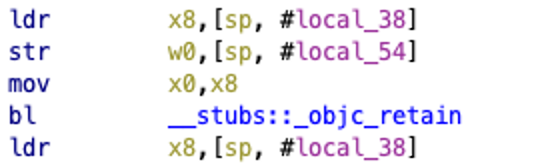
The above screenshot is where we want to focus within this function. The first instruction in my screenshot appears to be loading a value within the “sp” register that is being referenced as “#local_38” and being loaded into the x8 register.
The “mov” instruction moves the value from x8 to x0 followed by a “bl’ instruction to another function. After this, it closes so we can assume that X0 holds the value for the jailbreak detection and that is what we want to target.
Using the information we have gathered, one could write a Frida script to change that register value and bypass the protections. This blog post is focused on the reverse engineering side and gives an intro to those technologies, but look for an upcoming blog post to go over Frida scripting a bit more and how data gathered through reverse engineering can be applied.
Reverse engineering is a complex topic with a large variety of tools, applications, and analyses that need to be completed. The goal of this blog post was to give you a quick overview of some of the tools that can be utilized, how they can be used and to get you to start looking deeper into reverse engineering.
Keep an eye out for future blog posts where we will dig deeper into code modification after reversing, dynamic code changes using Frida and the ability to leverage Corellium to speed up the process.
Automating MAST and DAST with MATRIX and Viper
Manual reverse engineering is time-consuming—but Corellium Viper with MATRIX integration enables automated Mobile Application Security Testing (MAST) against OWASP Mobile Top 10 risks. Combined with Viper’s scenario-based testing and dynamic analysis tools, teams can validate security controls, identify vulnerable libraries, and trace app behaviors—all without leaving the Corellium environment.
Using Corellium Accelerates iOS Reverse Engineering Corellium
From jailbroken iOS 26 environments to deep memory inspection, Corellium allows you to reverse engineer iOS apps at scale. Save time by snapshotting states, debugging in real-time, and integrating with tools like Frida and Ghidra directly through the CLI or API. No physical devices required.
Equip your security teams with unprecedented tools for both manual and automated testing, freeing up valuable engineering time and saving money. Get jailbreak/root access, automated MAST workflows, and near-limitless virtual devices—on-prem, in the cloud, or via secure appliances. Book a live demo to see how Corellium streamlines mobile reverse engineering.