The Corellium Virtual Hardware Platform is the R&D platform for the next generation of smart devices. It allows for Arm-based smart devices to be virtualized natively on Arm-based servers, for unmatched virtual model accuracy, performance, and scale. With Corellium’s powerful Virtual Hardware Platform, teams have access to endless combinations of smart device models, operating systems, and mobile apps, all in one place. Everything you need to conduct extensive research and testing is available through a simple yet powerful browser interface, built-in security tools, and comprehensive APIs. The platform is purpose-built to strengthen security testing, streamline DevSecOps, and help dramatically accelerate R&D.
Terraform is an open-source tool for defining Infrastructure as Code (IaC). Terraform allows users to define and provision infrastructure using a declarative configuration language and ensure that infrastructure always conforms to a desired state. Terraform’s ability to automate the lifecycle of infrastructure from creation through teardown makes it a perfect tool for managing virtual devices on Corellium.
By combining Corellium with the power and flexibility of Terraform, users can streamline their approach to managing virtual devices, particularly for development and testing teams. Teams seeking to make their processes more efficient, scalable, and error-proof can leverage Terraform in continuous integration/continuous deployment (CI/CD) pipelines to enable rapid testing across a large range of devices with various configurations. By automating device provisioning, organizations can save on costs associated with manual provisioning and de-provisioning while simultaneously reducing the risk of human error.
Getting Started: Terraform with Corellium
To get started using Terraform with Corellium, first download the latest Terraform client.
Define Your Infrastructure
In this example, we will write a Terraform configuration file to create a new project and provision multiple virtual devices within Corellium.
Define Your Provider
First, define the Corellium provider in a new Terraform configuration file:
This snippet tells Terraform to download and use the Corellium Terraform provider when provisioning our infrastructure and to set the API Token and API Host for connecting to the Corellium API.
Note: Never include your API token directly in your Terraform configuration. Instead, use the `CORELLIUM_API_TOKEN` environment variable to pass your API token to Terraform. The example provided is for demo purposes only. See User API Tokens for how to create a new Corellium API Token for your account.
Create a New Project
Next, define a new project for our virtual devices:
In this snippet, we are telling Terraform to provision a new project called “Demo”, configure the project’s network, and assign a resource quota for the project.
Define Your Virtual Devices
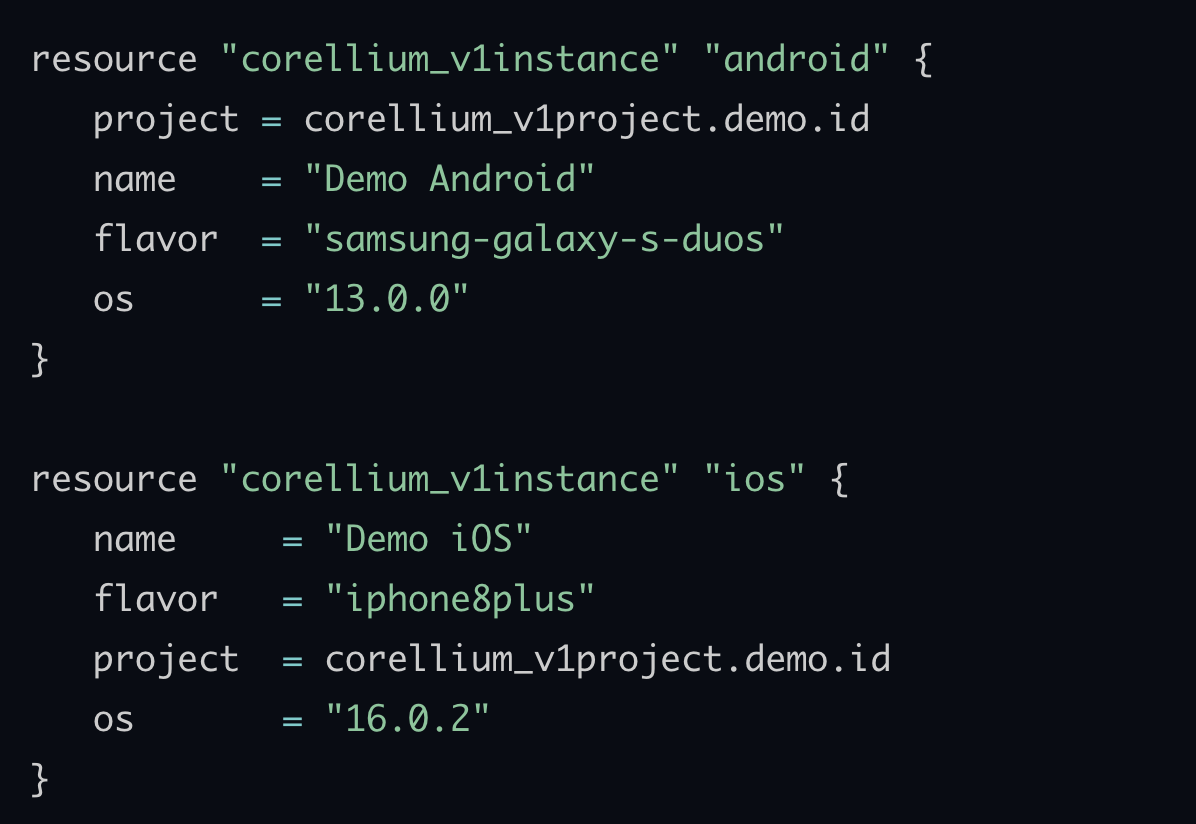
Finally, define our virtual devices that we want to create within our new project:
In this final snippet, we are instantiating two virtual devices inside of our Demo project: an Android Samsung Galaxy S Duos and an iPhone 8 Plus running iOS 16.0.2.
Putting It All Together
Here is our complete Terraform configuration file:
Save this Terraform configuration to a file called `main.tf` in a new folder.
Note: The filename doesn’t matter if it has a `.tf` extension. Here we use the standard Terraform convention of `main.tf` to define our main configuration file.
Initialize Terraform
Now that we have defined our infrastructure, we must initialize Terraform in the working directory containing our Terraform configuration.
Plan and Apply
To validate our configuration and see what resources will be provisioned within Corellium, run:
Once we are satisfied with our plan, we then apply the configuration to Corellium using:
Success! We now have a new Corellium project with one virtual Android and one virtual iOS device! From here we can easily modify our environment by updating our starting configuration and repeating the plan and apply steps.
Clean Up
When the devices are no longer needed, run
This command helps in cleaning up the resources, ensuring that you are only paying for what you use.
Final Thoughts
In the dynamic world of software development and testing, the ability to quickly create and manage virtual devices is crucial. By leveraging the power of Corellium to virtualize ARM-based devices with the ease of Terraform, organizations can enhance their efficiency and reduce their costs when managing virtual devices.
 MATRIX TechnologyMobile app testing and reporting automation.