SOAFEE (Scalable Open Architecture For Embedded Edge) was announced almost 4 years ago and has been steadily gaining traction as a go-to framework for software defined vehicles (SDV). SOAFEE Blueprints are now available from a variety of sources to demonstrate just how adaptable the platform can be. In this guide, we’ll walk through running the SOAFEE OpenADKit blueprint end-to-end on Corellium Atlas.
One of the original Blueprints is the Open AD Kit (OpenADKit), developed by the Autoware Foundation together with SOAFEE alliance partners. It serves as a great demonstration platform to highlight autonomous driving capabilities as well as how complex workloads can be executed in a variety of environments. After reading Odin Shen's fantastic Arm Learning Path about deploying this kit on a Neoverse server, I decided to replicate these same steps on our Arm RD-1AE virtual hardware model. Rather than needlessly duplicate all the steps which Odin laid out, I will instead provide some extra details on a few of the steps as they relate to our platform. At the end, I will also show how to use our Snapshot Sharing feature to eliminate most of the work and get right to the results.
Readying the platform
In order to run any of the steps below, you'll need an account on Corellium Atlas or Arm Virtual Hardware. You can request a free Atlas account here or, if you have an Arm ID, you log in directly to Arm Virtual Hardware. Either way, you'll get a trial account preloaded with free hours to try out the platform
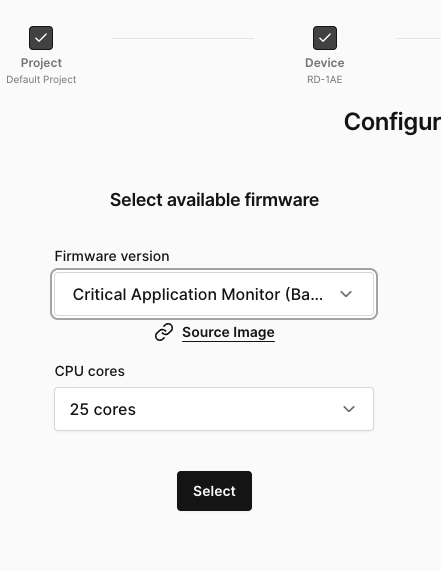
1) Login to the platform and create an Arm RD-1AE model. The Learning Path document suggests using 16 cores. On the RD-1AE, in order to get 16 Neoverse-V3AE cores you need to choose the 25 core option. The other nine cores are used by the safety island and control processors. You should choose the Critical Application Monitor (baremetal, Debian) Firmware Image.
Note that if you want to use any other OS instead of Debian you can install it using the instructions on our support page. The RD-1AE virtual hardware model will support any Arm SystemReady compliant OS and we've validated this with multiple images, including Red Hat AutoSD.
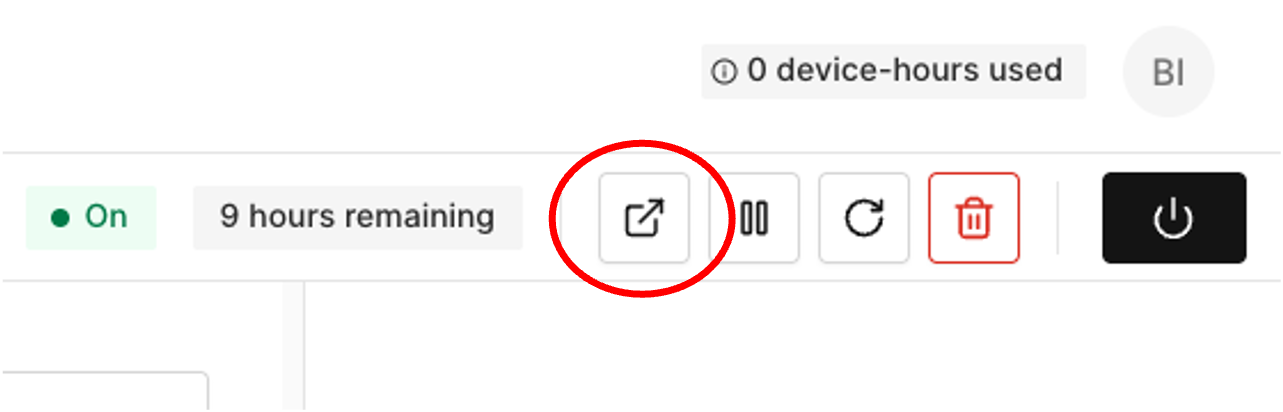
2) Corellium has extended the default RD-1AE platform to include support for a high resolution frame buffer. Using that is the simplest way to interact with the platform, although you can use the information in the Connect tab to run locally if you'd prefer. The default size for the display is rather small though, so I typically click on the Pop Out button in the upper right hand corner of the site to give the display its own window.
The default username is user and default password is password. The following steps will require entering text commands and the easiest way is to open a Terminal window using the icon on the bottom of the frame buffer display.
3) The provided Debian image does not have Docker installed and it's needed, so use the instructions on the Docker webpage to install it. Don't forget to do the post-installation steps as well or you'll need to use sudo whenever you run Docker.
Running the Platform
Once the platform is prepared, it's quite straightforward to follow the instructions in the Learning Path to download, install and configure OpenADKit. Note that although the document shows how to run each of the containers individually, if you just want to run the demo you can skip right to running the run.sh script once you've cloned the package.
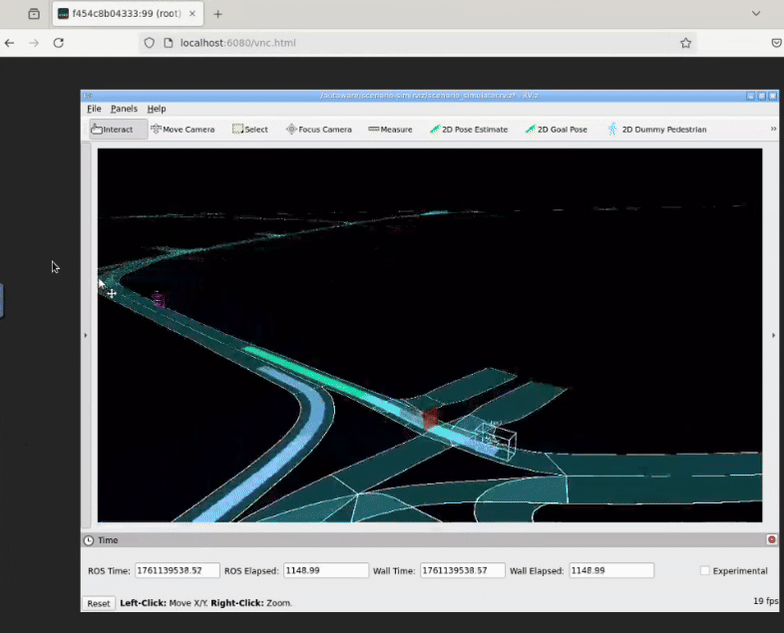
Once the demo is up and running, you can connect to it using a web browser. Debian has Firefox installed so you can start it either from the terminal or via the world button on the bottom of the display. You connect by opening the following address in your browser: http://localhost:6080/vnc.html When you are prompted for a password, enter openadkit
Skipping Setup: Snapshotting the SOAFEE OpenADKit SDV Testbed
If you want to see the SOAFEE OpenADKit SDV demo but don't want to go through all the work, you can leverage our snapshot capability and get your own copy of this same system. Snapshots are a powerful sharing tool and we and our customers use them extensively to replicate bugs and demo systems without the need for complex instructions. They're also very handy in training classes where you can simply share a single string and instantly, everyone in the class is up and running on their own copy of an identical system.
1) Log onto the platform and click on the Snapshots button on the top left part of your screen

2) Click on the Add Snapshot button in the upper right hand corner of your screen
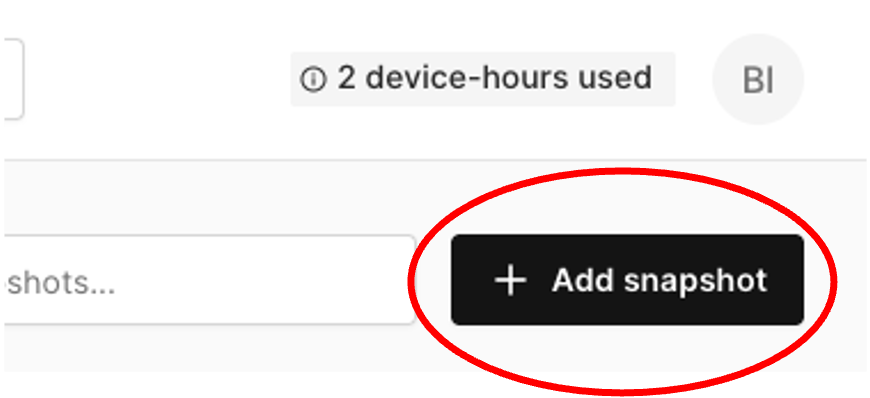
3) Input the following access code: 12AP1O67A9H3C
4) Click on the three dots to the right of the created snapshot and select Clone
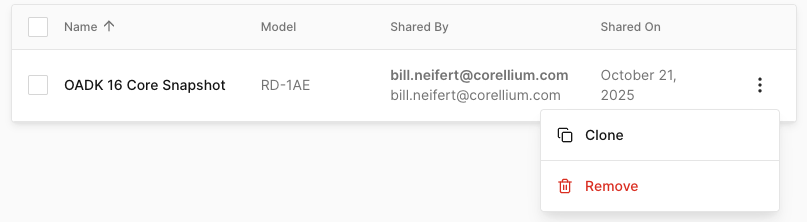
This will create a device named Clone of OADK 16 Cores in your device list (you can rename this in the settings tab of the device). This device has already gone through all of the steps above. You just need to open the device, run the demo script and connect the browser to see the demo.
When you've finished working with the platform, don't forget to either power it off or delete it. Simply navigating to another page will leave your device running and you'll quickly burn through all your trial hours.
As you can see, we didn't need to do anything special to run this SOAFEE Blueprint. We've been able to quickly bring up others as well without modification. Feel free to try out your own code, and reach out to us if you have any questions!
Ready to Run the SOAFEE OpenADKit Blueprint on Corellium Atlas?
Corellium Atlas makes it easy to run the SOAFEE OpenADKit blueprint as a reusable testing framework for SDV workloads—no extra hardware required. Start a free trial or talk with our team to spin up virtual Arm RD-1AE platforms, snapshot your environment, and share SDV demos in minutes.