Creating a Safe Browsing, Serverless API to scan iOS apps with Corellium & Frida on AWS Lambda

Creating a Safe Browsing, Serverless API to scan iOS apps with Corellium & Frida on AWS Lambda

The Challenge

You're checking your messages in the morning, and your new friend James Willy has sent you a link to a cool new iOS app he's developed. While you'd like to give feedback, the last Visual Studio project he sent you didn't load properly, so to be safe, it might be a good idea to scan the IPA.

You could send the IPA's URL to Google's Safe Browsing platform and cross your fingers that their static analysis works. If only there was a Safe Browsing API that you knew worked well for iOS apps..

How difficult could it be to create a Safe Browsing API to scan for malicious apps? Must be pretty difficult, given that even Apple outsources it to Google.

Screenshot of Apple’s legal statement about outsourcing safe browsing to Google.

Let's challenge that assumption, and create a prototype to scan iOS applications found on websites. We'll do it with zero physical devices, nothing running on our local machines once deployed, and for a few dollars a day (even with thousands of requests).

We'll solve this using:

- Corellium's virtual hardware and Python API

- Frida to scan memory for an "evil" pattern (e.g. as a starting place for you to add your own malware analysis)

- FastAPI as our RESTful endpoint that implements part of the Safe Browsing Lookup API (v4)

- AWS Lambda for deploying our solution as a serverless application

By the end of this article, you'll even have a lovely Swagger UI that looks like this!

An example of what the application that is being built could look like with Swagger UI.

Part 1 - Setting up Corellium

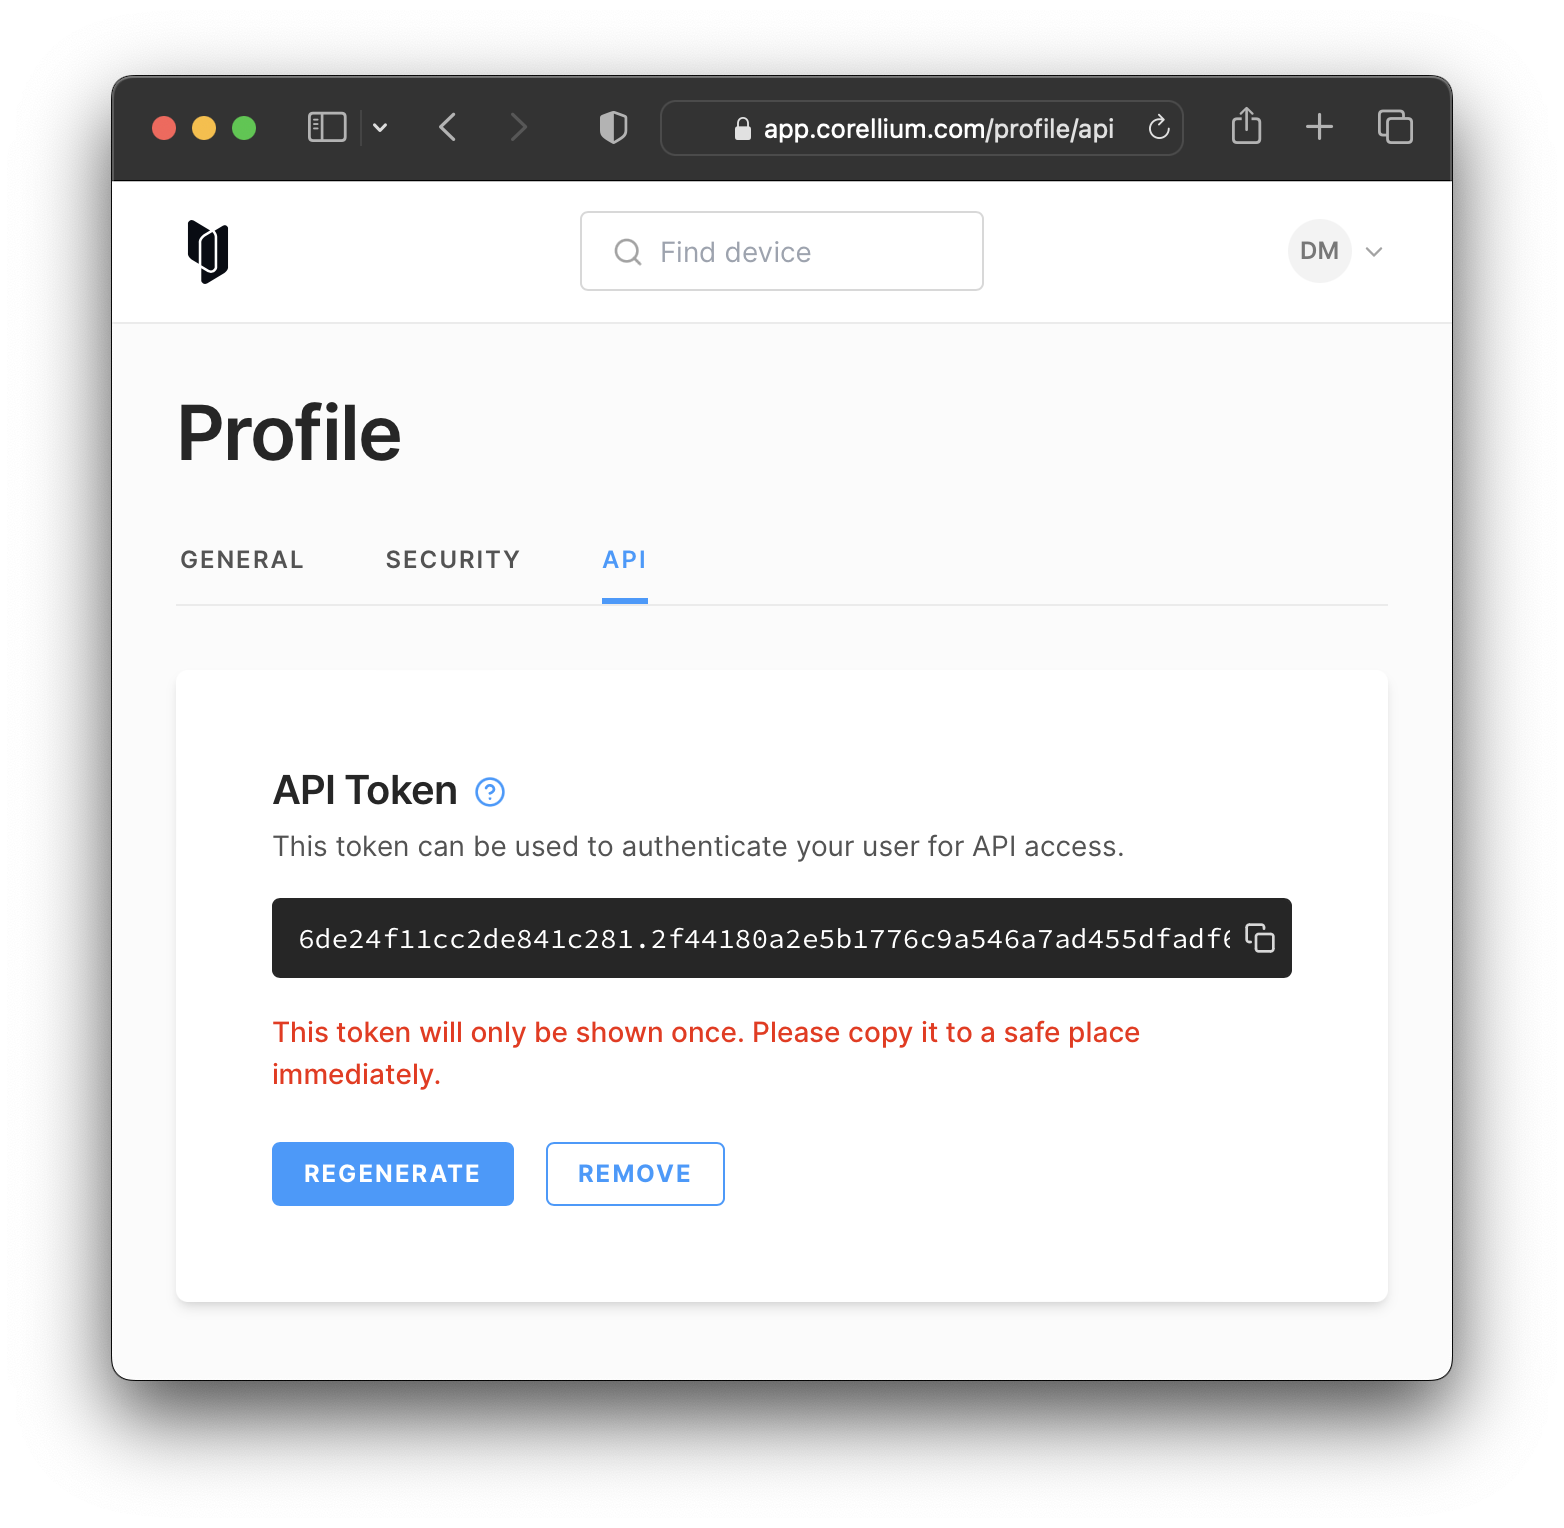
If you haven't already, go generate yourself an API token in the web UI. That's it.

A screenshot of Corellium’s API token generator UI.

Next, go ahead and create a jailbroken device on Corellium. Wait a bit for it to be booted, and that's it for setup.

For our application, you'll need to get:

- The instance ID, which can be found in the URL (circled in red)

- The project ID, which can be found in the SSH section (circled in green)

 (Both of these values can be obtained from the Corellium API as well.)

A screenshot of Corellium’s interface with the relevant information mentioned above circled in red and green, respectively.

Part 2 - Creating SSH tunnels in pure Python

Because we'd like to not care what OS our serverless application runs on, we're going to use pure Python (instead of calling out to an SSH binary).

First, let's create an API connection to Corellium.

configuration = corellium_api.Configuration(host="https://app.corellium.com/api")

configuration.access_token = CORELLIUM_API_TOKEN

api_client = corellium_api.ApiClient(configuration)

api_instance = corellium_api.CorelliumApi(api_client)

Let's generate a new temporary SSH key.

rsa_key = paramiko.RSAKey.generate(bits=2048)

And add it to our project.

project_key = {

    "type": "ssh",

    "label": "paramiko",

    "key": "{} {} {}".format(rsa_key.get_name(), rsa_key.get_base64(), "paramiko"),

}

await api_instance.v1_add_project_key(PROJECT_ID, project_key)

At this point, we can create a tunnel to Corellium's gateway!

transport = paramiko.Transport(

    ("proxy.corellium.com", 22),

    disabled_algorithms=dict(pubkeys=["rsa-sha2-512", "rsa-sha2-256"]),

)

transport.connect(

    hostkey=None,  # Might want to verify in production!

    username=PROJECT_ID,

    pkey=rsa_key,

)

Readers paying attention might wonder why the "disabled_algorithms" option is there. I'll save you the trial and error: it's because Paramiko defaults to a sig version that is unsupported by the SSH gateway on Corellium's proxy. https://stackoverflow.com/a/70567773

Using the transport tunnel to Corellium's gateway, we can now open up an SSH connection to the iOS device itself.

ssh_channel = transport.open_channel("direct-tcpip", (service_ip, 22), ("", 0))

ssh_client = paramiko.SSHClient()

ssh_client.set_missing_host_key_policy(paramiko.AutoAddPolicy())


ssh_client.connect(

    hostname=service_ip,

    username="root",

    password="alpine",

    sock=ssh_channel,

    allow_agent=False,

)


Part 3 - Port Forwarding Frida

The tunnel forwarding is a bit convoluted and not particularly interesting, so I've omitted it from this section. (I took an example from paramiko and modified it to work asynchronously.) ​​

def forward_tunnel(local_port, remote_host, remote_port):

    # Trust me, this works.

    # ...

forward_tunnel(27042, service_ip, 27042

Lastly, we need to forward Frida's port. We do this instead of modifying Frida to listen on 0.0.0.0, as this allows us to disconnect WiFi if needed without Frida disconnecting.

api_instance.v1_patch_instance(

    instance_id=INSTANCE_ID,

        patch_instance_options={

            "proxy": [

                {"devicePort": 22, "routerPort": 22, "firstAvailable": True},

                {

                   "devicePort": 32,

                   "routerPort": 32,

                   "firstAvailable": True,

                   "expose": True,

               },

               {"devicePort": 27042, "routerPort": 27042},

           ]

       },

   )

We're now able to use Frida's Python API as if we had the device plugged right into our machine!

device = frida.get_device_manager().add_remote_device("localhost:27042")

Part 4 - Frida Scripting

For the purpose of this demonstration, we're going to make a very simple Frida script that just looks for an "evil" byte pattern.

const pattern = '54 65 73 74 64 72 6f 69 64';

Process.enumerateRanges('---', {

   onMatch: function (current_range) {

       Memory.scan(current_range.base, current_range.size, pattern, {

           onMatch(current_address, current_size) {

               send(JSON.stringify({evil: true, module: Process.getModuleByAddress(current_address) }, null, 2))

               return 'stop';

           },

           onComplete() {


           }

       });

   },

   onComplete: function () {


   }

});

Part 5 - Installing apps and Frida messaging

As this service we're building takes in a URL to check, we're going to need to write a function that:

1. Downloads app at that URL.

2. Copies it to our Corellium device.

3. Installs the app on the Corellium device.

4. Runs the app with our Frida script hooks.

5. Uninstalls the app (alternatively, a safer option would be to restore the VM's state at the cost of speed).

async def install_ipa_and_run_script(ipa_url):

   with urlopen(ipa_url) as zipresp:

       plist_file = None

       app_name = None

       ipa_bytes = BytesIO(zipresp.read())


       with ZipFile(ipa_bytes, mode="r") as zfile:

           for zelem in zfile.infolist():

               if not zelem.is_dir():

                   tmp_path = Path(zelem.filename)

                   tmp_parts = tmp_path.parts

                   if (

                       tmp_parts[0] == "Payload"

                       and tmp_parts[1].endswith(".app")

                       and tmp_parts[2] == "Info.plist"

                   ):

                       plist_file = zelem.filename

                       break

           if plist_file is not None:

               with zfile.open(plist_file) as zbytes:

                   info_plist = plistlib.loads(zbytes.read(), fmt=plistlib.FMT_BINARY)

                   app_name = info_plist["CFBundleIdentifier"]


       if app_name is not None:

           ipa_bytes.seek(0)

           ipa_hash = hashlib.sha256(ipa_bytes.read())

           ipa_dest_filename = f"/tmp/{ipa_hash.hexdigest()}.ipa"

           logging.info(f"Copying {app_name} to device as {ipa_dest_filename}...")


           ipa_bytes.seek(0)

           sftp_client.putfo(ipa_bytes, ipa_dest_filename)


           logging.info(f"Installing {app_name}...")

           agent_install_body = {

               "path": ipa_dest_filename

           }

           api_response_instance_install = await api_instance.v1_agent_install_app(

               instance_id=INSTANCE_ID,

               agent_install_body=agent_install_body,

           )


           logging.info("Spawning app with Frida...")

           pid = device.spawn([app_name])

           device.resume(pid)

           session = device.attach(pid)


           script = session.create_script(

               """

               ... <removed>

               """

           )


           detected_evil = False


           def on_message(message, data):

               nonlocal detected_evil

               parsed_message = json.loads(message["payload"])


               if parsed_message["evil"]:

                   detected_evil = True

                   device.kill(pid)

                   script.unload()


           script.on("message", on_message)

           script.load()


           for _ in range(10):

               if detected_evil:

                   break

               time.sleep(0.1)


           logging.info(f"Uninstalling {app_name}...")

           await api_instance.v1_agent_uninstall_app(

               instance_id=INSTANCE_ID, bundle_id=app_name

           )

           session.detach()

           return (detected_evil, ipa_hash)

This script buffers the entire zip into memory (meaning up to ~4GB of usage), and I would encourage the reader to spend a bit of time on optimizing it if they intend on doing something similar at scale.

Part 6 - FastAPI

For those who have not used it before, FastAPI is a handy web framework for building RESTful APIs. It's incredibly easy to use.

Here's an example of how we're going to implement the "/v4/threatMatches:find" endpoint.

app = FastAPI(

   title="safe-browsing-v4-corellium", description=description, version="0.0.1"

)


@app.post(

   "/v4/threatMatches:find",

   responses={

       200: {"model": FindThreatMatchesResponse, "description": "Successful response"},

   },

   tags=["threatMatches"],

   response_model_by_alias=True,

)

async def safebrowsing_threat_matches_find(

    key: str = Query(None, description="API key.", example="1337"),

    find_threat_matches_request: FindThreatMatchesRequest = Body(None, description=""),

) -> FindThreatMatchesResponse:

    """Locates threat entries for Safe Browsing."""

    # ... <scripting from part 5 here>

For brevity's sake, I'm only including one class model example. The rest can be found in the full script.

class ThreatMatch(BaseModel):

   """

   ThreatMatch - A positive result for a ThreatEntry request.


       cache_duration: The cache_duration of this ThreatMatch [Optional].

       platform_type: The platform_type of this ThreatMatch [Optional].

       threat: The threat of this ThreatMatch [Optional].

       threat_entry_metadata: The threat_entry_metadata of this ThreatMatch [Optional].

       threat_entry_type: The threat_entry_type of this ThreatMatch [Optional].

       threat_type: The threat_type of this ThreatMatch [Optional].

   """


   cache_duration: Optional[str] = Field(

       alias="cacheDuration", default=None, example="30s"

   )

   platform_type: Optional[str] = Field(

       alias="platformType", default=None, example="IOS"

   )

   threat: Optional[ThreatEntry] = Field(alias="threat", default=None)

   threat_entry_metadata: Optional[ThreatEntryMetadata] = Field(

       alias="threatEntryMetadata", default=None

   )

   threat_entry_type: Optional[str] = Field(

       alias="threatEntryType", default=None, example="URL"

   )

   threat_type: Optional[str] = Field(

       alias="threatType", default=None, example=["UNWANTED_SOFTWARE"]

   )

Part 7 - Packaging for AWS Lambda

The only modification we need to do is adding this to our existing script.

handler = Mangum(app, lifespan="on")

Next, we'll create a CloudFormation template. This assumes this "template.yaml" file is in the root directory of our project, and we have both "app.py" and "requirements.txt" in the "python/" folder.

AWSTemplateFormatVersion: '2010-09-09'

Transform: AWS::Serverless-2016-10-31

Description: >

 safe-browsing-v4-corellium


 Safe Browsing APIs (v4) SAM template for Corellium


Resources:

 CorelliumLambdaFunction:

   Type: AWS::Serverless::Function

   Properties:

     CodeUri: python/

     Handler: app.handler

     Runtime: python3.9

     AutoPublishAlias: live

     Architectures:

      - arm64

     MemorySize: 1024

     Timeout: 60

     ReservedConcurrentExecutions: 1

     Environment:

       Variables:

         CORELLIUM_API_TOKEN: 'REMOVED'

         PROJECT_ID: 'REMOVED'

         INSTANCE_ID: 'REMOVED'


 CorelliumLambdaURL:

   Type: AWS::Lambda::Url

   DependsOn: CorelliumLambdaFunctionAliaslive

   Properties:

     AuthType: NONE # NONE OR AWS_IAM

     Qualifier: live

     TargetFunctionArn: !GetAtt CorelliumLambdaFunction.Arn


Outputs:

 CorelliumURL:

   Description: "CorelliumLambdaFunction URL Endpoint"

   Value:

     Fn::GetAtt: CorelliumLambdaURL.FunctionUrl

After saving all three files, run:

sam build

Part 8 - Deploying to AWS Lambda & Costs

Simply run:

sam deploy --region us-east-2

If you run into this unhelpful error message, it means you need to request a quota of >100 concurrent executions in your AWS account.

Specified ReservedConcurrentExecutions for function decreases account's UnreservedConcurrentExecution below its minimum value of [10].

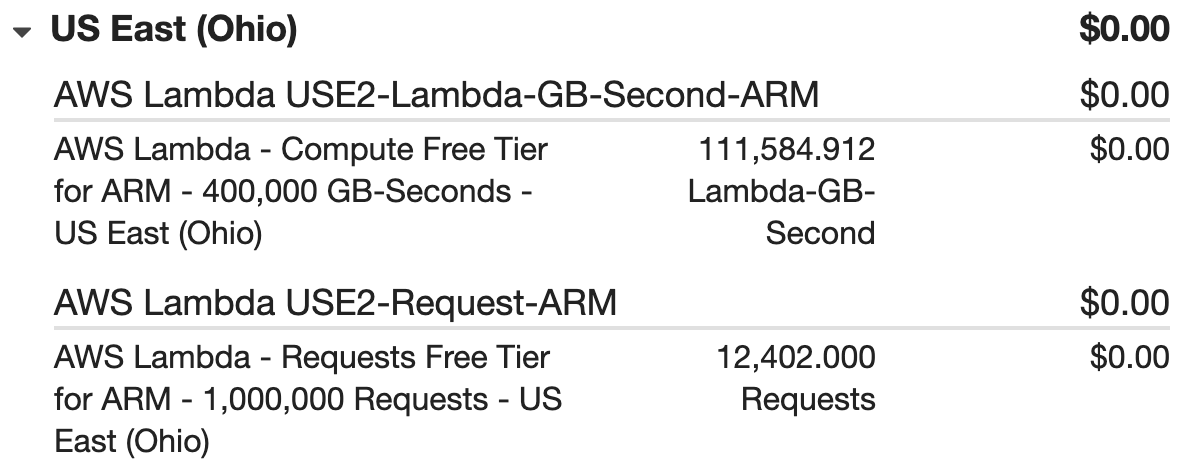
In terms of costs, data and duration should be minimal, as we're running our Lambda in the same region as Corellium. Here's my current AWS bill:


A receipt from AWS showing the cost of running the example code.

Part 9 - Demo

Does it work?! Yep!

A screenshot of the program running correctly.

Conclusion

Thanks to Corellium's virtual iOS devices, creating these types of services is manageable whether you're a large tech giant or a bored person with free time on your weekend.